Battery switch on travel trailer function is crucial for managing your RV’s power. Understanding how your battery switch works is key to preventing dead batteries and maximizing your off-grid adventures. This guide breaks down the different types of switches, how to use them safely, and how to troubleshoot common problems. We’ll cover everything from connecting and disconnecting batteries to performing essential maintenance, ensuring you’re prepared for any situation on the road.
This guide provides a comprehensive overview of travel trailer battery switches, covering various types, their functions, safe operation procedures, troubleshooting tips, maintenance, and upgrade considerations. Whether you’re a seasoned RVer or a newbie, mastering your battery switch is essential for a smooth and enjoyable camping experience.
Types of Battery Switches in Travel Trailers: Battery Switch On Travel Trailer Function

Choosing the right battery switch for your travel trailer is crucial for managing your power sources efficiently and safely. Different types offer varying levels of control and protection, impacting both convenience and the lifespan of your batteries. Understanding these differences will help you make an informed decision.
Single-Pole Battery Switches
A single-pole battery switch is the simplest type. It allows you to connect or disconnect a single battery from the trailer’s electrical system. This is suitable for trailers with only one battery. It’s easy to install and relatively inexpensive. However, it offers limited control, and doesn’t provide any isolation between batteries or systems.
Double-Pole Battery Switches
Double-pole switches offer more control than single-pole switches. They provide independent on/off control for two separate circuits. This is commonly used to isolate the house batteries from the chassis battery (used for starting the vehicle), or to separate two house batteries. This added isolation helps prevent accidental cross-connections and potential damage. The added complexity slightly increases installation time and cost compared to a single-pole switch.
So, you’re an audiophile who travels? Awesome! Check out this guide on building the perfect audiophile travel setup to keep your ears happy on the go. Don’t forget to sort out your insurance beforehand – getting Aon travel insurance is a smart move to protect your precious gear and yourself from unexpected mishaps. Seriously, peace of mind is worth it, especially when you’re carrying around some seriously expensive headphones.
Double-Pole Double-Throw (DPDT) Battery Switches
A DPDT switch is the most sophisticated type. It allows you to switch between two different battery banks (e.g., house batteries and a solar charging system) or even combine them. This provides maximum flexibility in managing your power sources. However, DPDT switches are more complex to install and are generally more expensive than simpler switches. They are most useful for trailers with multiple batteries or alternative power sources like solar panels.
Comparison Table of Battery Switch Types, Battery switch on travel trailer function
| Feature | Single-Pole | Double-Pole | Double-Pole Double-Throw (DPDT) |
|---|---|---|---|
| Number of Circuits Controlled | One | Two | Two (with switching capability) |
| Isolation Capabilities | None | Provides isolation between circuits | Provides isolation and switching between sources |
| Complexity | Low | Medium | High |
| Cost | Low | Medium | High |
| Installation Difficulty | Easy | Moderate | Difficult |
| Suitability | Single battery systems | Multiple battery systems requiring isolation | Complex power management systems |
| Benefits | Simple, inexpensive | Improved safety, better circuit management | Maximum flexibility, efficient power usage |
| Drawbacks | Limited functionality | More complex than single-pole | High cost, complex installation |
Function and Purpose of a Battery Switch
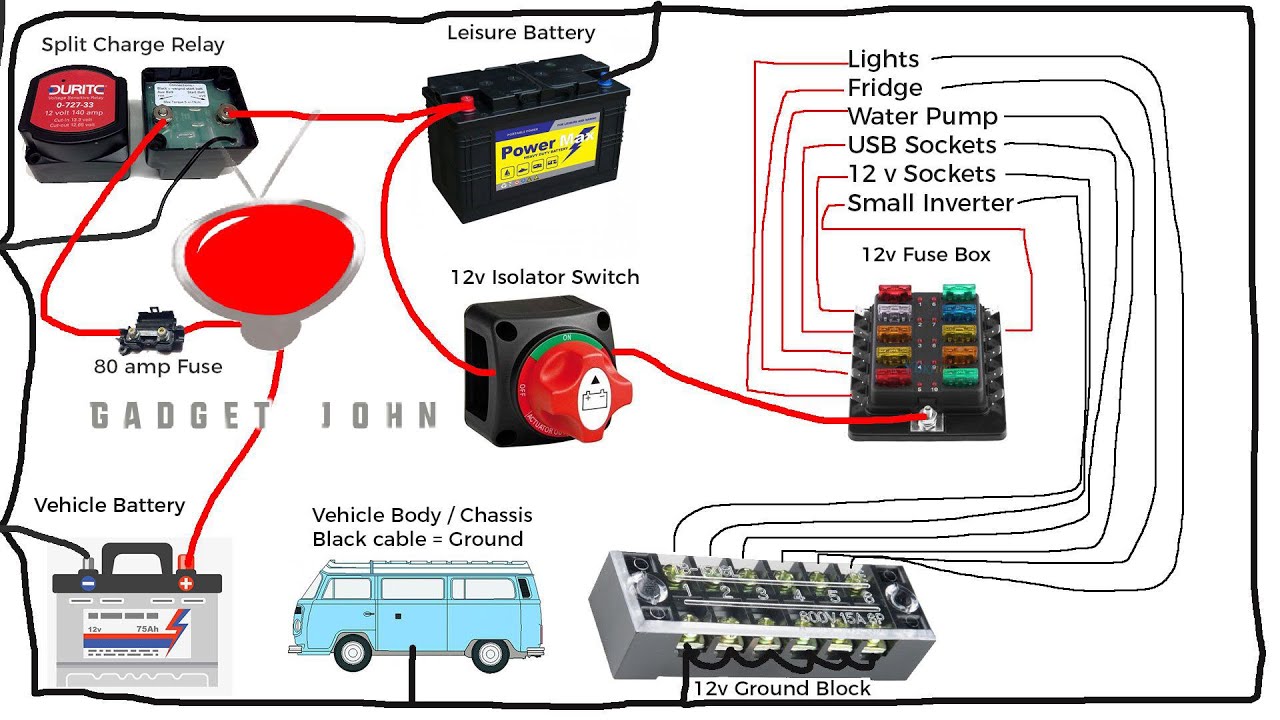
A battery switch in your travel trailer acts as the central control for your electrical system, allowing you to manage the flow of power between your different batteries. This seemingly simple device plays a crucial role in maximizing battery life, preventing accidental drain, and ensuring you have power when you need it.The primary function of a battery switch is to isolate or connect your house battery (which powers your interior lights, appliances, and other 12V systems) from your chassis battery (which powers your vehicle’s starting system).
This prevents the house battery from draining the chassis battery, and vice versa. It effectively acts as a gatekeeper, allowing you to selectively power different parts of your electrical system. Proper management of this power flow is essential for maintaining a reliable power supply and avoiding costly repairs.
Battery Switch Power Management
The battery switch achieves this power management through several positions. Typically, there’s an “Off” position that completely disconnects both batteries, preventing any power flow. A “Both” or “On” position connects both batteries in parallel, allowing you to charge the house battery from the chassis battery while driving, or to draw power from both for high-demand situations. Finally, a “House” or “Battery 1” position isolates the chassis battery and only powers the house battery and its connected systems.
This is crucial for conserving house battery power when the trailer isn’t connected to shore power or a generator.
Critical Scenarios for Battery Switch Use
There are several scenarios where using a battery switch is essential for preserving battery life and preventing issues. For example, if you leave your travel trailer parked for an extended period, switching to the “Off” position completely isolates both batteries, preventing any parasitic drain that could eventually lead to a dead battery. Similarly, if you experience a problem with your house battery, you can use the switch to isolate it and prevent it from draining the chassis battery, ensuring you can still start your tow vehicle.
Another critical scenario is during long trips where you might need to conserve the house battery power by only running the essential appliances, this is easily managed through the switch. Finally, during maintenance, the ability to completely disconnect the house battery allows for safe work on the trailer’s electrical system.
Connecting and Disconnecting Batteries
Connecting and disconnecting your travel trailer’s batteries using a battery switch is a crucial safety procedure. Improper handling can lead to sparks, short circuits, and even battery damage. Following these steps will ensure a safe and efficient process.Properly using your battery switch is essential for managing power in your RV. Understanding the different switch positions and their effects on power flow is key to preventing electrical problems and ensuring the longevity of your batteries.
Battery Switch Positions and Their Effects
Imagine a typical four-position battery switch. Each position controls the flow of power from your batteries to your trailer’s electrical systems. Here’s a breakdown:
OFF: In this position, all power is disconnected from both the house and chassis batteries. This is the safest position when your RV is not in use or when performing maintenance on the electrical system. No power flows to any system.
HOUSE: This position connects only the house battery to your RV’s interior circuits (lights, appliances, etc.). The chassis battery remains disconnected. Power flows only to the house systems.
BOTH: Both the house and chassis batteries are connected to your RV’s electrical systems. This position provides maximum power, useful when running high-power appliances or demanding devices. Power flows to both house and chassis systems.
CHASSIS: This position connects only the chassis battery to the trailer’s external systems, such as the running lights, brakes, and other components that require power while driving. The house battery remains disconnected. Power flows only to the chassis systems.
Step-by-Step Procedure for Connecting and Disconnecting Batteries
Before you begin any work with your batteries, always ensure that you’re wearing appropriate safety glasses and gloves.
- Identify your battery switch. It’s usually located near your batteries, often in a dedicated compartment or on the tongue of your trailer.
- Turn the battery switch to the “OFF” position. This ensures that no power is flowing to any circuits before you make any connections or disconnections.
- Connect or disconnect batteries as needed. For connecting, simply turn the switch to the desired position (“HOUSE,” “BOTH,” or “CHASSIS”). For disconnecting, turn the switch to “OFF”.
- Verify the power flow. After changing the switch position, check that power is flowing correctly to the intended circuits. For example, if you’ve selected “HOUSE,” your interior lights should work, but your running lights might not.
- Always return the switch to the “OFF” position when finished or when leaving your trailer unattended. This is a crucial safety precaution to prevent accidental discharges or short circuits.
Flowchart for Switching Between Battery Sources
The following describes a flowchart illustrating the process of switching between battery sources. Imagine a visual representation with boxes and arrows.
Start: Begin at the “OFF” position of the battery switch.
Decide on the required power source: Do you need power for house systems, chassis systems, or both?
Select appropriate switch position: Based on your power needs, rotate the switch to “HOUSE,” “BOTH,” or “CHASSIS”.
So, you’re an audiophile who travels? Awesome! Check out this guide on setting up your audiophile travel setup for amazing sound on the go. It’s crucial to protect your gear, and while you’re planning, don’t forget travel insurance! Consider getting a quote from Aon travel insurance to cover any unexpected mishaps to your precious equipment.
Peace of mind is priceless, especially when you’re carrying high-value audio gear.
Verify power: Check that the correct systems are receiving power.
End: When finished, return the switch to the “OFF” position.
Battery Switch Maintenance
Keeping your travel trailer’s battery switch in good working order is crucial for reliable power and to prevent potentially dangerous situations. Regular maintenance ensures the safe and efficient operation of your battery system, preventing corrosion, loose connections, and ultimately, battery failure. Neglecting maintenance can lead to power outages, stranded trips, and even fire hazards.Regular inspection and cleaning of your battery switch and associated wiring are essential preventative measures.
A simple maintenance schedule can significantly extend the lifespan of your components and avoid costly repairs down the road. Think of it like changing the oil in your car – a small effort that yields significant long-term benefits.
Battery Switch and Wiring Inspection Schedule
A recommended maintenance schedule involves a visual inspection at least twice a year, ideally before and after the main camping season. This should include a thorough check of all connections, looking for signs of corrosion, looseness, or damage. Additionally, a more detailed cleaning and tightening should be performed annually. For those who use their trailers frequently, more frequent inspections might be beneficial.
Consider the conditions in which your trailer is stored and the environmental factors affecting it when deciding on your inspection frequency.
Cleaning Battery Terminals and Connections
Before beginning any cleaning, always disconnect the negative battery cable first to prevent accidental short circuits. This is a critical safety precaution. Then, follow these steps:
- Gather Supplies: You’ll need a wire brush (preferably a brass one to avoid scratching), baking soda, water, a stiff-bristled brush, and a terminal cleaner or corrosion remover (optional). Protective gloves are also recommended.
- Prepare the Solution: Mix a paste of baking soda and water. This is a gentle yet effective cleaner for battery terminals.
- Clean the Terminals: Use the wire brush to remove any corrosion from the battery terminals and the switch connections. Scrub thoroughly until the metal is clean and shiny. Pay close attention to any crevices where corrosion might be hiding.
- Apply the Baking Soda Paste: Apply the baking soda paste to the terminals and connections. Let it sit for a few minutes to help loosen any remaining corrosion.
- Scrub Again: Use the stiff-bristled brush to scrub away the paste and any remaining corrosion.
- Rinse and Dry: Rinse the terminals and connections thoroughly with clean water. Dry them completely with a clean cloth. Avoid leaving any moisture behind.
- Apply Terminal Protector (Optional): For added protection, apply a battery terminal protector or anti-corrosion grease to the cleaned terminals and connections. This helps prevent future corrosion.
- Reconnect the Batteries: Carefully reconnect the negative battery cable first, followed by the positive cable. Double-check all connections to ensure they are secure.
Remember: Always disconnect the negative terminal first and reconnect it last to prevent accidental short circuits.
Mastering your travel trailer’s battery switch is about more than just turning power on and off; it’s about understanding your RV’s electrical system and ensuring safe and efficient power management. By following the safety guidelines and maintenance procedures Artikeld here, you can prevent costly repairs, extend the life of your batteries, and enjoy worry-free adventures. So, get to know your battery switch – it’s your key to a power-packed RV experience!
General Inquiries
What happens if I leave my battery switch in the “Both” position?
Leaving the switch in the “Both” position constantly can drain your batteries faster, especially if you have parasitic draws (devices consuming power even when turned off). It’s best to turn off the switch when not using the RV for extended periods.
How often should I clean my battery terminals?
Clean your battery terminals at least twice a year, or more often if you notice corrosion buildup. Regular cleaning prevents poor connections and ensures optimal power flow.
Can I use any type of battery switch in my travel trailer?
No, the appropriate battery switch depends on your RV’s electrical system and battery configuration. Check your RV’s manual or consult a qualified technician to determine the correct type.
My battery switch is stuck. What should I do?
Try using a penetrating lubricant on the switch mechanism. If that doesn’t work, you may need to replace the switch. Avoid forcing a stuck switch, as you could damage it further.
